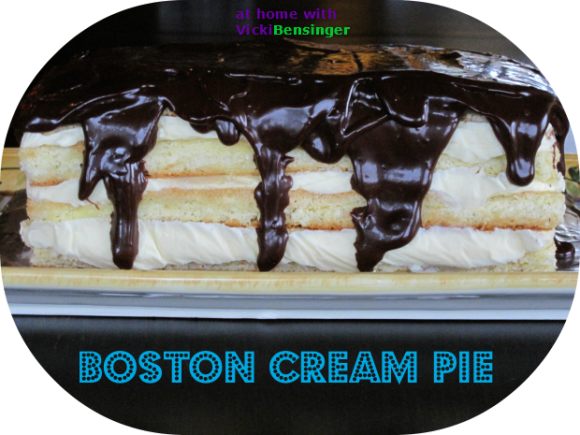
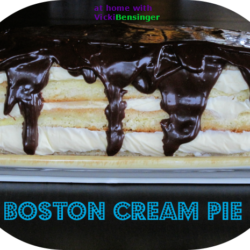
Boston Cream Pie
Both of my kids celebrate their birthdays in August. I asked my son (27) what cake he wanted me to make and he chose my Mile High Carrot Cake. My daughter (24) on the other hand fell in love with Boston Cream Pie while going to school in Boston and selected that. You might recall my post about Mike’s Pastry Shop in Boston where we both did some serious indulging while I spent a long weekend there.
I’d never made Boston Cream Pie before, but since my little girl wanted it, I would make that for her, and the carrot cake for my son.
Boston Cream Pie isn’t really a pie. First served in 1856 in the Parker House hotel in Boston, now known as the Omni Parker House, it’s actually a vanilla sponge cake filled with pastry cream and topped with a chocolate glaze.
I remembered seeing a recipe for Boston Cream Pie in Joanne Chang’s “flour, too” cookbook . Joanne has a cafe and bakery in Boston as well. I reviewed the recipe at least 16 times, reading it over and over again. It was so detailed I was afraid I’d leave something out. Joanne’s version is a slightly lighter adaptation of the original Boston Cream Pie.
Joanne’s wording although detailed, did leave some room for interpretation which could make the difference from a wonderful cake, to a flop. For instance, the sponge cake calls for 4 eggs, separated, plus 3 egg whites. My take on this was to use 4 egg yolks with 7 egg whites. However, when my daughter and I went to make the cake (she wanted to help), she insisted I was wrong. I went online to see if I could find Joanne’s Boston Cream Pie recipe with comments, low and behold Joanne commented on this site that the recipe was as I had predicted. Obviously others had their doubts. I’m glad we checked.
There are 14 steps in this recipe, although within those steps it also calls to make a Pastry Cream, and Chocolate Ganache, requiring you to view other pages in the cookbook for those recipes. This is quite detailed.
I decided to spread the recipe out over 3 days, especially since we are still vacationing in the mountains and had other plans on our agenda. I’m glad I did, however, when I make this again, I will spread it out over 4 days before serving. Why?
The sponge cake has coffee flavored syrup that is brushed over the top, then each layer is filled with the pastry/whipped cream combination. At this point it’s placed in the freezer overnight. Three hours before serving, the cake is removed from the freezer, and the chocolate ganache is poured over the top, then left out to thaw.
We left and went out for a birthday dinner. Upon our arrival we lit the candles on both cakes, and had a slice of both the carrot cake and Boston Cream Pie. The Boston Cream Pie had such a strong coffee flavor none of us could eat it. I was so disgusted as you can imagine, since this cake took so long to prepare. BUT WAIT!
My first thought was to just pitch the cake realizing no one would eat it. I decided to hold off, covered it in plastic wrap, and placed it in the refrigerator. I thought, I’ll try it tomorrow just in case we disliked it merely because we were all so stuffed from dinner.
That next day after lunch I decided to try a small slice. OMG! I couldn’t believe it. The Boston Cream Pie had no hint of coffee flavoring at all. Now mind you we love coffee, except my husband, but it was as though it seeped into the cake overnight after having thawed and was delicious! I had to be sure my taste buds weren’t playing a trick on me, so asked my family to try another slice. They agreed, the coffee flavor was gone and they loved it. What a relief!
I was so thrilled with the outcome, especially with the amount of effort that went into this cake. So to add to Joanne Chang’s recipe:
After pouring the chocolate ganache over the frozen cake – leave cake out for 3 hours to thaw. Then cover with plastic wrap and place in the refrigerator for another 24 hours. Remove from the refrigerator and serve.
Here’s the recipe:
Boston Cream Pie
Ingredients:
- 4 large eggs, separated, plus 3 egg whites
- 1 cup granulated sugar
- 2 tablespoons freshly squeezed lemon juice
- 3/4 cups all-purpose flour
- pinch kosher salt
- 1/3 cup hot brewed coffee
- 1/3 cup granulated sugar
- 1 cup heavy cream
- 1 3/4 cup Pastry Cream (see separate recipe)
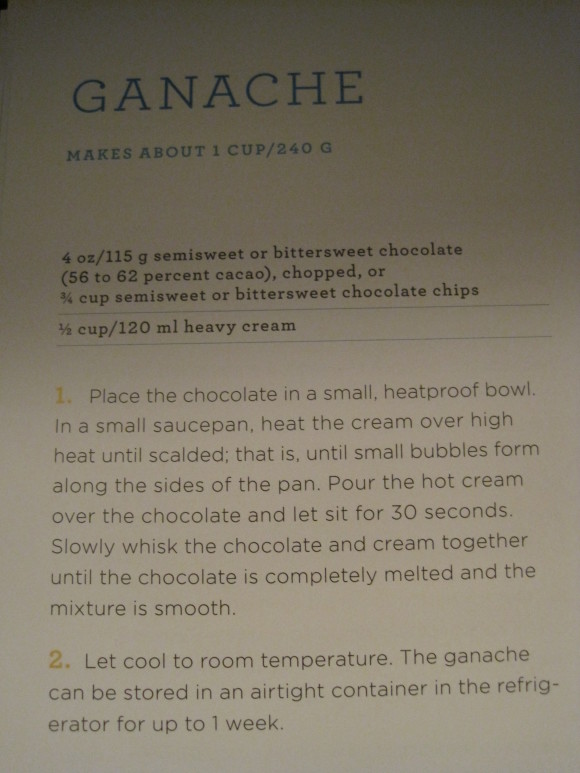
- 1 cup Ganache (see recipe below), warmed
Directions:
- Special equipment: 13- by 18-inch rimmed baking sheet, parchment paper, stand mixer with whisk attachment or handheld mixer, sifter or sieve, offset spatula, clean cardboard.
- To make the sponge cake: Preheat the oven to 350°F/180°C, and place a rack in the middle of the oven. Line the baking sheet with parchment paper.
- Using the stand mixer or the handheld mixer and a medium bowl, beat together the egg yolks, 1⁄4 cup (50 g) of the sugar, and the lemon juice on high speed for at least 6 to 8 minutes if using the stand mixer or 10 to 12 minutes if using the handheld mixer, or until thick and doubled in volume. Stop the mixer once or twice and scrape down the sides of the bowl and the whisk to ensure the sugar and yolks are evenly mixed. Transfer to a large bowl and set aside.
- Clean the bowl and the whisk attachment or beaters (they must be spotless) and beat the egg whites on medium speed for 2 to 3 minutes with the stand mixer or 4 to 6 minutes with the handheld mixer, or until soft peaks form. The whites will start to froth and turn into bubbles, and eventually the yellowy viscous part will disappear. Keep beating until you can see the tines of the whisk or beaters leaving a slight trail in the whites. To test for the soft-peak stage, stop the mixer and lift the whisk or beaters out of the whites; the whites should peak and then droop. With the mixer on medium speed, add the remaining 3/4 cup (150 g) sugar very slowly, a spoonful or so at a time, taking about 1 minute to add all of the sugar. Continue beating on medium speed for another 2 to 3 minutes, or until the whites are glossy and shiny and hold a stiff peak when you slowly lift the whisk or beaters straight up and out of the whites.
- Using a rubber spatula, gently fold about one third of the whipped whites into the yolk mixture to lighten it. Then gently fold in the remaining egg whites. Sift the flour and salt together over the top of the mixture and fold in gently until the flour is completely incorporated. Pour the batter into the prepared baking sheet.
- Using the offset spatula, carefully spread the batter evenly to cover the entire baking sheet. Concentrate on spreading the batter toward the corners and edges of the pan. The center will be easier to fill once the edges are filled with batter. Don’t worry about the top being perfectly smooth; it is more important that the batter be spread evenly so that the cake is the same thickness throughout. Bake the cake for 18 to 24 minutes, rotating the baking sheet back to front about halfway through, or until the top is pale golden brown and springs back when pressed in the center with your fingertips and the cake doesn’t stick to your fingers. Let the cake cool in the pan on the wire rack for about 5 minutes.
- Line a large cutting board with parchment. Run a paring knife around the edge of the still-warm cake to release it from the sides of the baking sheet, and invert the cake onto the parchment. Carefully peel off the parchment and allow the cake to cool completely. Using a chef’s knife, cut the cake in half crosswise and then in half lengthwise. You should now have four cake layers, each about 5 1/2 by 8 inches. Cut the cardboard so that its dimensions are just slightly larger than the cake layer dimensions.
- To make the soaking syrup: In a small bowl, stir together the coffee and sugar until the sugar has dissolved.
- Using the pastry brush, brush the top of all four cake rectangles evenly with the soaking syrup, using up all of the syrup.
- Place one cake layer, syrup-side up, on the prepared cardboard rectangle. In a medium bowl, using a mixer or a whisk, whip the heavy cream until it holds very firm, stiff peaks. Fold in the pastry cream (see separate recipe) until well combined. Using the offset spatula, spread about one third of the cream mixture over the cake layer. There is a tendency for the cream to mound in the center, so be sure to spread the cream out to the edges of the cake. In fact, to make the best-looking cake possible, it is better if the cream layer is slightly thicker along the edge than in the center.
- Place a second cake layer, syrup-side up, on top of the cream layer and press down gently so the cake layer is level. Using the offset spatula, spread about half of the remaining cream mixture over the cake layer. Again, you want to spread the cream a bit thicker along the edge of the rectangle to prevent the final cake from doming.
- Place a third cake layer, syrup-side up, on top of the cream and press down slightly to level the cake. Using the offset spatula, spread the remaining cream mixture over the cake, again making it a bit thicker along the edges than in the center. Top the cake with the final cake layer, syrup-side up, and press down gently so that the top layer is flat. Lightly wrap the cake with plastic wrap, place in the freezer, and freeze for about 8 hours or up to overnight, or until it is frozen solid. (At this point, the cake can instead be put into the freezer just until it has firmed up and then it can be well wrapped and frozen for up to 2 weeks.)
- At least 3 hours in advance of serving, remove the cake from the freezer and place it on a cutting board. Using a chef’s knife dipped in very hot water, trim the edges of the cake so that they are neat and even. (These trimmings make for great snacking.) Dip and wipe the knife clean several times as you trim to make sure you get a neat, sharp edge on the cake. Trim the cardboard underneath so it is flush with the cake.
- Place the cake on its cardboard base on a cooling rack set on a baking sheet. Pour the warm ganache (see separate recipe) over the top of the cake. Using the offset spatula, spread the ganache in an even layer. It will begin to firm up right away when it hits the cold cake, so work quickly to even the surface. Let the excess ganache drip down the sides of the cake, leaving some parts of the cake exposed. Let the ganache set for several seconds, then transfer the cake to a serving plate. Let the cake thaw at room temperature before serving.
flour, too
By Joanne Chang
Enjoy!!!
 Hi, I’m Vicki Bensinger! I have been teaching culinary classes throughout Missouri since 1992. I offer personalized private culinary classes for individuals and small groups in the comfort of your home or organization.

Good it has turned out GREAT! Though I am not a coffee drinker, I do enjoy baked goods flavoured with coffee.
Angie once we left the cake to sit in the refrigerator overnight after it’s initial thawing you couldn’t even taste the flavor of coffee. It’s so delicious I’m embarrassed to say I’ve even had some slices for breakfast. Definitely not great for the diet but so good. A very thin slice goes a long way and totally satisfies.
I’ve never had this experience with a cake before but am so glad it turned out to be a winner and a keeper!
Glad the cake worked out! The original recipe is actually a lot less involved than the one you tried – check out Fanny Farmer. I like the idea of the coffee, but it’s almost taking the cake in the direction of Tiramisu (kinda sorta). This does look quite delish, however, though I’m not sure I’ll be looking at that cookbook anytime soon!
I thought the same thing John – Tiramisu but it doesn’t taste like it at all. Once left to set in the refrigerator overnight the coffee flavor totally disappeared. It’s hard to wonder where it went to. The flavor was delicious once it had the chance to absorb into everything.
Joanne’s cookbooks are wonderful. I have her first one as well. Take a look at it next time you go to Barnes and Noble, she has lots of great recipes in them.
I have the Fannie Farmer book at home, I’ll check that out when I get there. We’re heading home tomorrow.
I have heard of this cake before, it’s kind of a legend I think. ^.^
So your daughter is in my age! I didn’t know that you had kids Vicky.
Glad you waited after all, I wonder where the coffee flavor disappeared. Nice one!
Oh I know, I could probably be a lot of bloggers moms but I still feel like a kid myself.
Yes this is a legendary cake but I’ve looked and haven’t seen coffee added to it before. As John mentioned above it reminded me a bit of Tiramisu when I made it without the ladyfingers but once left to set was very different.
I have no idea how the coffee flavor disappeared but I’m glad it did. I love coffee but initially it was overpowering. I will definitely make this again. It is rather labor intensive but well worth it.
HI Vicki! Thank you for the lovely comment and welcome to our blog! I love reading some of your recipes and this boston creme pie is to die for! Yum-my!
Thank you for stopping by my blog as well. I hope you’ll come back to try some of my recipes. The Boston Cream Pie was yummy and was gobbled up fast.
I am so glad the pie worked…We love coffee and this Pie is something I could eat a lot of. Happy birthday to your kids. I love reading your stories and enjoy your blog. Been a silent follower for while now…Glad to know you.
Thank you so much for stopping by. I’m always excited to hear about those that are frequent readers of my blog but silent. So glad you posted a comment. I hope you’ll stop by more often to share your thoughts.
Have a great day!
My dad LOVES boston cream pie – it’s his favorite! He’d love this!
It was my dads favorite as well. I wish he could have had a slice of this cake, I know he would have loved it. I hope you have the chance to make this and share it with your dad. I’d love to hear what he thinks of it.
So glad this was a winner after all…whew. It is one impressive cake! Perfect for a special occasion. My daughter already has her request in for her Sept. birthday 🙂
Yes I’m glad it turned out to everyone’s liking as well. So what will you be making for your daughter’s birthday this year?
Vicki, I love coffee so don’t mind the flavor in baked goods, but I wonder how the coffee flavor disappeared by refrigerating. The cake sounds delicious, however I don’t have patience to follow 14 steps. Next year when you make cake for your children think of me as well, I am Leo… celebrated my birthday a week ago.
Happy Birthday Balvinder. I know 14 steps was a lot and then some of those steps meant going to a different recipe to follow those instructions. Although long, by dividing it up into 3 days it only took a short amount of time on each of those days which made it not so bad. You just really have to read the instructions well and mark off what you’ve done. You could do it, it wasn’t hard just lots of steps.
As for the coffee flavor, I think what happens is that once the cake is defrosted the coffee flavored syrup has the opportunity to seep into the layers of the cake and pastry cream. Although according to my daughter there was still a slight coffee flavor remaining, I didn’t notice it so much. Occasionally on a bit or two I did, but not much. I believe it dispersed itself throughout the cake once it had the chance to sit defrosted, giving it a heavenly flavor.
WOW! What a process, but what a cake! Your daughter is so lucky to have a great mom like you!
Oh you’re so sweet. I love birthdays and always like to make a big to do about them. Afterall, we have one special day devoted to each of us, so a celebration is definitely called for.
This looks like a really delicious dessert.
It was, I hope you’ll try making it.
Ahh…so beautiful! Boston Cream pie is one of my favorites! Looks and sounds utterly delicious!
It was Kathy, I hope you’ll try it.
I’m so happy that the cake redeemed itself Vickie, that made it worth all the work. Sounds like you’ve had a wonderful family time together, I know there’s been lots of delicious food!
You have no idea how happy I was Chris when that 4th day I decided to try it one last time hoping it would taste better. What a pleasant surprise. Who would have known it would change like that in one night.
We had a wonderful time on our trip and we’re now home and back to reality!
Hi Vicki, I was just thinking about making one of these Boston Cream Pies, and your looks fabulous!! I would have thought your daughter was right about the egg whites, but glad you were able to find out. I would have pitched the cake, glad it worked out in the end. I would definitely skip the coffee part since we aren’t not coffee people, but it does look wonderful.
Hi Suzanne, in the end the coffee flavor was not pronounced at all. It seeped into the cake leaving it with a heavenly flavor. However, if you’re not a fan, then you could completely omit that or add some other type of syrup with a liqueur or even simple syurp.
As for the eggs, if you read the directions carefully it said 4 eggs PLUS 3 egg whites. So 4 eggs would be 4 yolks and 4 egg whites. The PLUS is what throws you off. I forgot to add the link where I viewed that, I need to go back right now and put that in for others to see.
I have Joanne Chang’s “Flour”, and yet have to get the “too”…I love Boston cream pie…the creamy pastry cream in between the cake, and covered with chocolate ganache…yum!
Glad that you had a great time…hope you are enjoying your week Vicki 😀
I haven’t prepared anything out of her first book but have a few things I definitely want to try soon.
I think you’ll enjoy this cake if you make it.
Thanks for stopping by.
Vicki , you had me at coffee syrup 😉 I haven’t made this yet though I’ve been eyeing some recipes since forever . I just checked our local library online catalogue for Ms Chang’s book , sadly , no listing yet 😛
You can always use the recipe I’ve posted. I haven’t missed any details. Let me know what you think if you try it.
Very interesting what you said about the taste the second day! Boston Cream Pie was one of the very first things I tried making when I was first learning how to bake but I haven’t made it for years and years. Something I can remedy now that you’ve done all of the testing 🙂
It really wasn’t hard especially when spreading it out over several days. There are a lot of steps so just be sure to read each one carefully. I think I read over the recipe at least 16 times. There’s a lot to read and I didn’t want to mess it up for my daughter. We all loved it in the end – especially after letting it set in the refrigerator thawed for an extra day. I suppose it had time for all the flavors to meld together.
Just mouthwatering…looks delicious!
it was, I hope you’ll try it.
This is a very interesting recipe, especially what you wrote about the change in taste at the next day.
It made me curious to try out the recipe, knowing to wait for the next day to enjoy its flavor.
Thanks for sharing!
If you do try it please let me know your thoughts.
My daughter has already requested Red Velvet Cake for her birthday. I posted it nearly 3 years ago…I’m sure the photos could use some updating…I’m kind of scared to look at them!