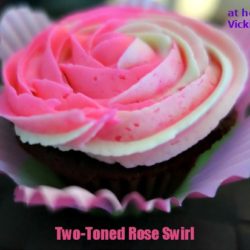
How to Make Two-Toned Rose Swirled Cupcakes

Valentines Day will be here shortly and if you’re like me you’ll want to make something special. I love baking so I thought I’d bake up some cupcakes and decorate them like a bouquet of roses.
If you’re a frequent visitor to At Home with Vicki Bensinger then you might be familiar with my video on “how to make a rose swirl.” Those were made with just one color so I decided to add in another color for some contrast.
In the recipe below I baked one of my favorite cupcakes and decorated them with a classic buttercream icing (recipe below). In addition though I created 2 separate buttercream icing colors to match the paper liners that each cupcake sets into.
This method is so easy and looks beautiful. Create a bouquet of rose cupcakes, cookies or an entire cake decorated with roses. You’re sure to steal the heart of anyone who gets these.
Here’s the recipe………….
Classic Vanilla Buttercream
Ingredients:
- 2 sticks unsalted butter
- 8 cups ( 2 lb.) powdered sugar
- 2 tsp. vanilla, use clear imitation vanilla if you like a whiter frosting
- 1/3 c. milk
- pinch of salt if you’d like to cut the sweetness
- 12" & 18" pastry bags
- Wilton 1M open star tip
- Liqua-Gel Food Coloring
Directions:
1. Cream softened butter until smooth.
2. Blend in the vanilla.
3. Add half of the powdered sugar and half of the milk. Beat at medium speed until powdered sugar is incorporated. Add remaining powdered sugar and milk and beat until texture becomes smooth.
4. Divide frosting into two separate bowls and add color using Liqua-Gel coloring (found at bakery supply stores or craft stores like Michaels).
5. Place colored frosting into two 12" pastry bags (I use disposable) with 1-inch of the tip cut off and gently flatten bag with the frosting coming out.
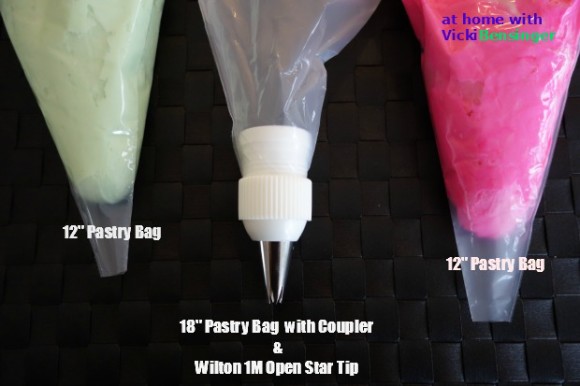
6. Insert coupler into 18" pastry bag, place Open Star tip onto coupler base, then seal with coupler screw top.
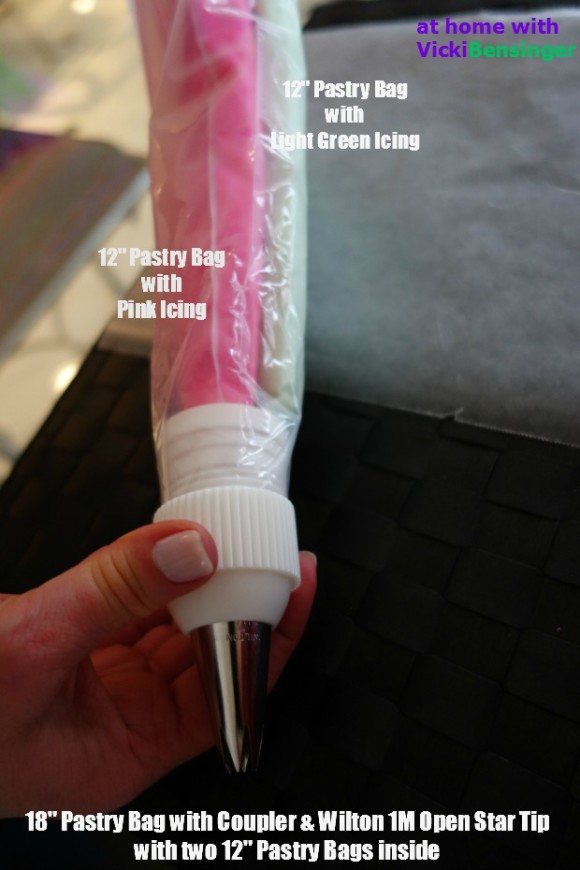
7. Carefully set both 12" pastry bags into the larger 18" pastry bag so the open ends are setting inside of the opening of the pastry tip.
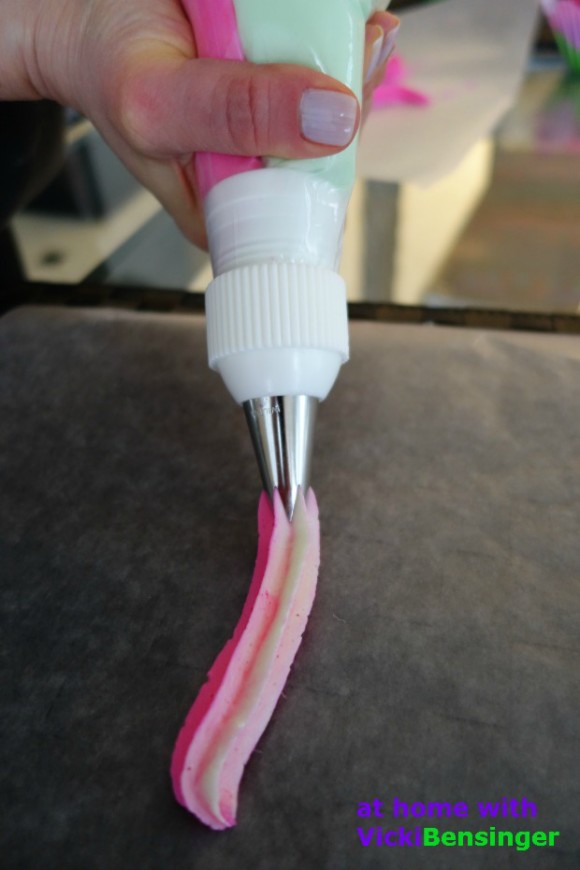
8. Holding upright, twist all three tops together and squeeze until both colors emerge from the 1M Open Star tip. Squeeze onto wax paper until both colors emerge and air pockets are released.
9. Now you're ready to ice your cupcakes, cookies or cake as seen in this video. Your final result will look like this.
Have fun experimenting with your favorite colors.
*Buttercream icing can be frozen in air tight container for at least three months. Thaw on countertop.
 Hi, I’m Vicki Bensinger! I have been teaching culinary classes throughout Missouri since 1992. I offer personalized private culinary classes for individuals and small groups in the comfort of your home or organization.

What a great effect! I’m decorating-challenged so I never attempt this sort of thing. But it’s my own fault — because I never attempt it, how can I possibly get competent at it? 😉 Fun post — thanks.
You should try it John it’s really quite simple or have Mrs. KR do them.
I love the two toned swirl- so pretty!
Thanks Betty, they make them that much more special.
Awesome…the two toned swirl…it sure add a nice touch to the swirl…thanks for the post Vicki.
Have a great week 😀
You’re welcome. Thanks for stopping by.
The swirls look really pretty and sexy!
Sexy! Yes you’re right they do look a bit sexy. 😉
Pretty swirls and nice step by step pictures.
Thank you and thank you for stopping by.
That is such a gorgeous decorating technique 😀
Thanks for the pictorial!
Cheers
Choc Chip Uru
You’re welcome. I couldn’t think of how else to describe it so step by step or video seemed to be the best way. I’m glad you liked it.
very pretty fun for valentines
Yes they will be perfect for Valentine’s Day or using other colors this technique can work for any occasion.
These are beautiful Vicki and a wonderful technique for an elegant presentation!
So pretty! Thanks for the tutorial 🙂
These are just lovely! I’ve always wondered how the two-toned twirl was done. Thanks !
What a wonderful tutorial, Vicki! I have always failed miserably at decorating but would love to try these beautifully rose swirls one day. Time to make a list of supplies 🙂
What gorgeous icing!!! I’ve been wanting to try this technique and I think your method looks easier than others I’ve seen. Thanks so much, Vicki!