Homemade Braided Challah
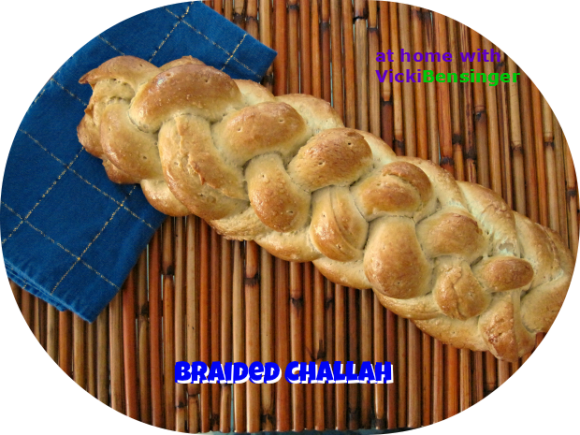
I don’t make bread that often, but when I do, I love the aroma that permeates through my house as they bake in the oven. I bake quick breads often and popovers, but loaves that require hours and hours on end of proofing (time to rise) I typically don’t have time for. A favorite of mine is Challah or Brioche – an egg bread which requires 4+ hours to rise. 
It’s been years since I made Challah. In fact, last time was probably back in the 60s with my grandmother – I was quite young. I decided to make it again this weekend since I had time. I found a recipe online from Fine Cooking that claimed to be similar to that from Whole Foods – whose Challah I think is heavenly!
I braided my Challah with six braids – what fun, until my husband came into the kitchen and distracted me!. I lost my place and twice had to start over. That said, it’s really not difficult, you just need to focus. While focusing so much I forgot to add raisins to the dough. I prefer that for added sweetness.
Overall, my loaf was delicious and beautiful, and it makes incredible french toast. However, next time I’ll make it by combining the honey, water, and yeast together until they react, then add the flour. This recipe has you adding some flour to the yeast mix to start, which is fine. However, I prefer making my breads the other way – personal preference. I hope you’ll give this a try.
Fine Cooking shared a step-by-step video for braiding challah that I found useful especially since I haven’t made this in years. I think you’ll find it helpful too.
Here’s the recipe, and once you’ve followed the directions, view the video to make your own 6 braided loaf…….
Homemade Braided Challah
Ingredients:
- 2 tsp. instant yeast (Red Star Quick Rise, SAF Perfect Rise, Fleischmann’s Rapid Rise or Fleischmann’s Bread Machine Yeast)
- 16-3/4 oz. (3-1/2 cups) unbleached all-purpose flour (Hecker’s, Gold Medal, or Pillsbury); more as needed
- 1/4 cup warm water
- 3 large eggs
- 1/4 cup canola oil
- 1/4 cup honey
- 1-1/2 tsp. table salt
For the glaze:
- 1 egg, lightly beaten
- Sesame or poppy seeds for sprinkling (optional)
Directions:
1. In a large bowl, mix the yeast with 1/2 cup of the flour. Add the warm water, stir, and let this mixture, called a sponge, sit until it starts to puff up, 15-to 20-minutes. Add the eggs, oil, honey, and salt; stir until well combined. The sponge will remain lumpy—this is fine. Add the remaining flour and mix the dough in the bowl until all the ingredients are combined. Turn the dough out onto a work surface and knead until fairly smooth, about 2 minutes. The dough should feel very firm and will be hard to knead. If it’s soft and sticky, add more flour until it’s very firm. Transfer the dough to a large, clean container and cover it well. Let it rise until doubled in bulk and very soft to the touch, about 2 hours, depending on the room temperature. Line an insulated baking sheet with parchment or oiled foil. If you don’t have an insulated sheet, stack two sheets together (this keeps the bottom of the bread from over browning during baking).
2. To shape the dough: Turn the dough out onto a lightly floured work surface and sprinkle a little more flour over it. Spread and flatten the dough a bit, but don’t worry about punching it down. Cut it into six equal pieces. Set aside the dough pieces, cover them lightly with plastic, and brush all the flour
off the work surface. Have a small bowl of water handy. Using no flour, roll a piece of dough with a rolling pin into a very thin sheet, between 1/8 and 1/4 inch thick (don’t worry about making a rectangle; an amoeba-type shape is fine). The dough may stick to the work surface; this is alright—just nudge it gently with a dough scraper. Tightly roll up the sheet like a carpet to form a strand. Roll the strand back and forth between your hands until it’s thin, very even, and 12 to 15 inches long. At the ends of the strand, angle the outer edge of your hands into the work surface as you’re rolling to make the ends pointy and the strand thicker in the middle (This will help you get a football-shaped loaf). The strand needs to grip the work surface slightly during this rolling; the “grab” will help as you roll. If the strand is too slick, very lightly dampen it with water to help it grip the work surface better. Repeat the rolling out, rolling up, and elongating steps with the remaining five pieces of dough, rolling them out to the same length. Lightly sprinkle all the strands with flour to prevent them from sticking to one another during proofing. Arrange the strands parallel to one another. At one end, gather and pinch the strands very tightly together. Weight the end with a heavy canister to keep the braid from moving and to leave your hands free, and braid closely, following the illustrations below. Lightly tap each end of the loaf with your palms to tuck it under the loaf.
a. Move the second-to-the-right strand to the far-left position.
b. Move the far-right strand left over two strands, to the center position (spread the strands apart to make room).
c. Move the new second-to-the-left strand over to the far right position.
d. Move the far-left strand (the same strand you moved in step a) over two strands to the center position. Now repeat the steps.
3. Transfer the braid to the lined baking sheet and cover it loosely but thoroughly with plastic wrap. Let proof until doubled in bulk and the loaf remains indented when lightly pressed, about 2 hours, depending on room temperature. (If in doubt, let the dough proof more rather than less.)
4. To bake: Position an oven rack in the lower third of the oven and heat the oven to 325°F. Just before baking, brush the dough with the beaten egg. Sprinkle with sesame seeds or poppy seeds, if using. With a thin wooden skewer, poke the bread deeply all over (the holes will prevent air pockets and help the bread keep its shape during baking). Bake for 20 minutes. Rotate the challah 180 degrees and bake until the bread is a dark, burnished brown, about another 15 minutes. (If the challah is browning too rapidly cover it loosely with foil and let it finish baking. Don’t remove the loaf too soon, as you’ll risk under baking.) Let cool thoroughly on a rack.
Fine Cooking: Issue 54
 Hi, I’m Vicki Bensinger! I have been teaching culinary classes throughout Missouri since 1992. I offer personalized private culinary classes for individuals and small groups in the comfort of your home or organization.
Challah is my go to bread for making bread pudding and the raisins are great for that extra sweetness! Great job..
Hi Gerry, thank you for your comment. I could kick myself that I forgot to add the raisins that were sitting right on my counter. I guess I’ll just have to make it again so I can add them. The best part of making a recipe IMO is creating it over and over again until you tweek it just the way you like.
Challah bread pudding is heavenly. I haven’t made that in years, although when I did I used store bought challah. Now you’ve inspired me!
I have been planning to try a challah since long time but never got to bake it. Your detailed and well explained recipe is beckoning me to try it asap. Thanks for sharing.
The video is a great tutorial. It’s a fun project to do especially with the weather getting cooler. I hope you’ll try it.
That’s a wonderfully braided challah, Vicki.
Thanks Angie. You make incredible loaves of bread, I’m sure your version would be spectacular!
Gorgeous, Vicki! I tried to do a 6 braid and failed miserably! I, too, found a video (from Joan Nathan, I think) and plan to try a pumpkin challah this week. You inspire me!!!
Liz I had to go back and watch that video several times especially since my husband kept walking in the kitchen and chatting with me. He couldn’t understand why I kept losing track of where I was but someone when the dough is all intertwined I just couldn’t pick up where I left off. I haven’t seen Joan’s video but the Fine Cooking one was definitely helpful. Pumpkin Challah sounds perfect for the fall. I’ve seen some recipes for it. I can’t wait to see yours, I’m sure it will be stunning!
We (well, Mrs KR) bake most of our bread these days. Haven’t done Challah yet, however. I love the way it looks! And tastes, of course. Yours looks spectacular – thanks for sharing!
Challah is an egg bread. It’s delicious just sliced with bread, for french toast, bread pudding, for stuffing in turkeys, and whatever else you can think to use it for. I hope you try it someday. It’s fun to make.
This is so impressive!! I’ve never made challah bread before…it’s on my blog “bucket” list, though.
I think you’ll have fun making it and love the flavor.
One day… one day Vicki! I really want to be able to make this at home. So beautiful. I’m going to improve my baking skills and will tackle it eventually. 😀
It’s not hard to do. It just takes time. You can do whatever you need to get done in between rises. I hope you’ll try it someday.
I love challah bread…yours look so nice…love the way your shaped…
Thanks for the recipe Vicki and hope you are having a fun week 😀
Check out the video if you’re thinking of trying it. The video is so helpful!
Homemade challah…if I make it right, just like you made, I would be so happy. Last time I made it, I was not quite satisfied with the result. But now I am going to try this again. Your challah is my inspiration, which looks gorgeous and just perfect. I am sure, adding raisins would make it taste awesome!
It takes time but don’t rush it and it will turn out perfect I’m certain.
That is one gorgeous challah, Vicki! I’ve always been curious to try it myself. Thanks for sharing your recipe!
It’s definitely fun to make and even better to eat. Plus your house will smell amazing! I hope you’ll try it.
How beautiful is this bread?! I love challah… especially when it’s a day old and I can use it in bread pudding 😉
Yes I know, bread pudding is the best with challah. Next time I make a loaf I’ll have to reserve some for bread pudding.
I do make bread very often but for gluten free breads the process is slightly different, you don’t knead or braid just mix the flour as you do for a cake or popovers and then the proofing and baking is same. You have baked a beautiful challah and the video is very helpful.
I’ve never tried a gluten free challah but that would be something good for me to teach myself.
I thought the video was helpful too that’s why I decided to share it. Whether braiding challah or some other bread, the technique she uses is very good and explained so well.
Thank you for the compliment.
Oh Vicky! this is simply beautiful – I’ve learnt more about making bread from your post and comments left than reading a book on it! I’m plucking up courage to give it a try!!!
Mary x
It’s really not hard at all Mary, just time consuming. If you run your errands while the bread is proofing then it won’t seem like it takes much time at all. Your such a great cook I’m sure you’ll have no trouble with it at all. Thank you for the compliment!
Vicki this bread is beautiful and i sure it tasted wonderful as well. I haven’t tried Challah but have been wanting to for a while now, think I might have to after seeing this beauty.
I hope you do try it. It’s delicious and makes the house smell incredible.
Well, you may not bake bread much, but when you do – WOW! What a gorgeous challah! Beautiful braid and I’m sure it taste as good as it looks.
It did taste delicious and thank you for the compliment. I do try to avoid bread since it just makes my waistline spread and isn’t the best for our bodies anyway. This time of year though I seem to gravitate to it so why not try and bake some instead of just buying it.
The braid was fun to make. I hope you’ll try this.
How did I miss this post of the most wonderful looking bread. LOVE love baking bread. I think it’s one of the most therapeutic things. i love challah in french toast, you have done a great job Vicki.
Gorgeous braid! I finally made a 6 braid challah…it took me many videos to figure it out. I’d love to try your recipe next!
I foll
I followed your recipe and it turned out wonderfully! Thank you for sharing your recipe! It’s the easiest six-strand braid I’ve ever found!
I followed your directions exactly. The best directions for a six-strand challah ever! The bread turned our wonderfully! It is so delicious! Thank you for sharing your recipe. I’ll use it again and again.